


To draw a sock, start by sketching the basic shape of a curved rectangle. Next, add a cuff at the top and a heel shape at the back. Then, draw the toe area and complete the details of the sock. Mastering the art of drawing a sock can be both fun and rewarding, providing a creative outlet for your artistic skills. Whether you’re a beginner or looking to improve your drawing abilities, learning how to draw a sock can be a great starting point. Get ready to explore the world of art and design through this simple yet delightful exercise!

How to Draw a Sock: A Step-by-Step Guide for Kids
Do you want to learn how to draw a cute and cozy sock? Drawing can be a fun and creative activity for kids of all ages. In this step-by-step guide, we will show you how to draw a colorful and adorable sock in easy-to-follow instructions. So, grab your markers and paper, and let’s get started on this artistic journey!
Materials You Will Need
Before we begin drawing our sock, make sure you have the following materials ready:
- White paper or drawing pad
- Colored markers or pencils
- Pencil for sketching
- Eraser
Now that you have everything you need, let’s dive into the fun part of drawing a sock!
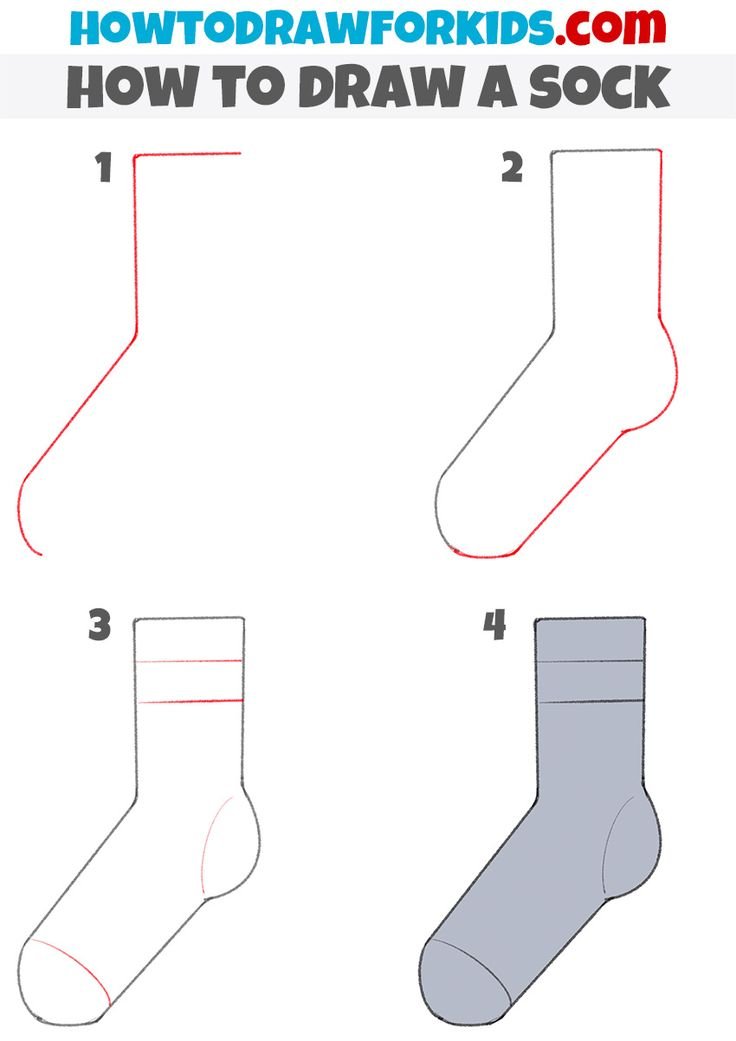
Step 1: Sketch the Outline of the Sock
Start by drawing a simple outline of the sock. You can begin by sketching an elongated oval shape that is slightly curved at the top and bottom. This will be the main body of the sock.
Pro Tip:
You can use light pencil strokes for the outline so that you can easily erase any mistakes later on.
Step 2: Add Details to the Sock
Next, let’s add some details to our sock to make it look more realistic. Draw a wavy line across the middle of the sock to represent the opening where you slide your foot in. You can also add some stripes or patterns to decorate your sock.
Pro Tip:
Get creative with your designs! Your sock can have polka dots, stripes, or even smiley faces.
Step 3: Color Your Sock
Now it’s time to bring your sock to life with some colors! Use your markers or colored pencils to fill in the sock with vibrant colors. You can choose any color combination you like – from classic white and black to funky rainbow colors.
Pro Tip:
Don’t forget to color inside the lines to make your sock look neat and colorful.
Step 4: Add Shadows and Highlights
To make your sock look more three-dimensional, you can add shadows and highlights. Shade the bottom part of the sock slightly darker to create a shadow effect. You can also add some lighter colors to the top part of the sock to represent highlights.
Pro Tip:
Use different shades of the same color to create a realistic shadow and highlight effect.
Step 5: Final Touches
Once you are happy with how your sock looks, it’s time for some final touches. You can add some extra details like tiny hearts, stars, or any other decorations to make your sock unique and special.
Pro Tip:
Sign your artwork at the bottom corner to show that you are the talented artist behind this beautiful sock drawing!
Congratulations! You have successfully drawn a colorful and adorable sock. Drawing is a great way to express your creativity and imagination. Remember, practice makes perfect, so keep on drawing and exploring new art techniques.
We hope you enjoyed this step-by-step guide on how to draw a sock. Share your masterpiece with your friends and family, and don’t forget to have fun while creating your own colorful socks!
Now, grab your art supplies and start drawing your next masterpiece. Happy drawing!
How To Draw A Lost Sock
Frequently Asked Questions
How can I start drawing a sock?
To draw a sock, begin by sketching the outline of the sock’s shape using a pencil. Start with a simple tube-like shape for the leg part and then add the foot section at the bottom. Remember to keep the lines light and loose to allow for adjustments as you refine the details.
What details should I focus on when drawing a sock?
When drawing a sock, pay attention to the ribbed cuff at the top, the heel and toe areas, and any patterns or designs on the sock. Add texture to the fabric by lightly shading areas to create depth and dimension. Don’t forget to include any folds or wrinkles to make the sock look realistic.
How can I make my sock drawing look more realistic?
To make your sock drawing look more realistic, observe the way fabric drapes and creases when worn. Add shadows under the ribbed cuff and around the heel to create a sense of volume. Use a variety of line weights to define different parts of the sock and make it appear more three-dimensional.
Final Thoughts
To draw a sock, start by sketching the basic shape and adding details like stripes and patterns. Remember to shade appropriately to create a realistic look. Practice drawing different styles and designs to improve your skills. Experiment with various techniques to bring your sock drawings to life. Happy drawing your socks!